Thursday, September 30, 2010

Fresh Peach Pie

This is an awesome fresh peach pie recipe from my sister Janae. It is light, refreshing and not too sweet. Doesn't this picture make you want to take a bite? You can make this two different ways, as pictured or with a cream cheese filling layered on the bottom! Either way is delish! If you have fresh peaches and like pie, this recipe is a must!

Fresh Peach Pie - Janae Turner

2 cups sliced peaches

1/4 cup sugar (or Splenda)

1 tablespoon of lemon juice

3 tablespoons cornstarch

2 tablespoons butter

1/4 teaspoon of almond extract

dash of salt to taste

1 cooked and cooled pie crust


Directions:
Combine peaches, lemon juice and sugar

Let stand for 1 hour

Drain peaches should be 1 cup of juice if not add orange juice to make 1 cup

In sauce pan on stove add cornstarch and cook until thickened. and the butter almond extract a dash of salt. let cool

Gently fold in filling with peaches and place is a cooked and cooled pie crust.

Chill and serve with whipped topping


Cream cheese layer on bottom- Optional

1 8 oz package of cream cheese

1 cup powdered sugar

1 teaspoon vanilla

2 cups whipping cream or cool whip

Mix together place on bottom of pie crust and layer peaches w/ filling on top

Chill until ready to serve

Tuesday, September 28, 2010

Mexican Veggie Dip

I friend of mine brought this to a Christmas dinner party and I fell in love with it! I have made it a number of times and am finally sharing it with you. It is so refreshing with the veggies and satisfying with the dip. This is a new family favorite! I almost forgot to take a picture so this is a picture of it half gone from the pan :)

Mexican Veggie Dip

Mix together:

2 blocks of cream cheese, softened

¾ cup mayo

2-4 tsp taco seasoning ( to taste)

Spread in the bottom of a 9x13 pan

In a large bowl, mix together:

1 can corn

1 can black beans, drained and rinsed

sliced green onion

1 red bell pepper, chopped

Spread the veggie mixture over dip and serve with chips. So refreshing and yummy!

Sweet Potato Oven Fries and Island Chicken

I made this for dinner a while back and it was a hit with the family. I love sweet potatoes and this is one of my favorite ways to make them. Super easy and healthier than fried potatoes. The chicken is from my Friend's blog Taste Every Season and is flavorful and pairs great with the sweet potatoes!

Sweet Potato Oven Fries
Peel and slice up sweet potatoes in the shape for fries. Drizzle with olive oil, and season with salt & pepper. Roast in a 400* oven for 15-20 minutes until done. It's that easy!

Island Chicken from Jessica at Taste Every Season

Marinade:
½ cup vegetable oil
3 tbsp. lemon juice
1½ tbsp. soy sauce
1 clove garlic, minced or pressed
½ tsp. dried oregano
¼ tsp. salt
Freshly ground black pepper
2-4 chicken breasts

How to Make:
1. Combine all ingredients except chicken in a mixing bowl or large airtight plastic bag. Whisk or shake well until the marinade is well mixed. Add the chicken breasts to the bowl or plastic bag so that they are covered by the marinade. If using a bowl, cover tightly with plastic wrap. If using a plastic bag, press out all the excess air and seal the bag tightly. Refrigerate and marinate up to 10 hours. (the longer the better)

2. When ready to cook the chicken, preheat the oven to 350° F. Place the chicken breasts in a baking dish and pour the excess marinade over them. Bake in the oven until cooked through and the internal temperature reaches 165° F, about 45 minutes (exact baking time will depend on the size of your chicken pieces.) Remove from the oven and let rest for 5 minutes before serving.
OR Preheat an outdoor or indoor grill. When heated grill chicken for about 7 minutes on each side until done.

Chicken Chop Suey/Chow Mein

I got this recipe from my same sister-in-law that shared the Mandaran Orange Salad recipe with me. She actually made this recipe up for a class assignment in high school where she had to do a demo in class. I love this recipe, it just hits the spot and has a nice flavor. I hope you enjoy it as much as we do!
Chicken Chop Suey/Chow Mien
from Susan Miller

Melt 2 -3 Tbs. butter or oil in wok or frying pan

Add:
1 chopped onion and cook for 3 minutes

Add:
2-3 carrots, sliced
2-1 stalks celery, sliced
1 tsp salt
pepper to taste
1 ½ c water
Cook for 5 minutes.

Add:
1 can bean sprouts drained
2 cups cooked cut chicken
1 can sliced chestnuts, drained (optional)
Cook for approx. 5 minutes

Mix together:
2 Tbs water
2 Tbs corn starch
1 Tbs soy sauce
1 tsp sugar

Add sauce to meat/vegetable mixture and cook 1 minute to thicken.
Serve over chow mien noodles or rice and top with chow mein or rice noodles. Drizzle with Soy Sauce to taste.

Sweedish Pancakes

These puppies are a favorite breakfast in our home. They are like a crepe but thicker. I like to drizzle them with syrup, the kids like to sprinkle cinnamon sugar on them and roll them up. There are many ways to top them. So delish!

Swedish Pancakes
4 eggs
2 c flour
1 tsp salt
2 tsp sugar
¼ c oil
2 c milk

Milk together and cook as for crepes but a little thicker. Top with syrup, cinnamon sugar, powdered sugar, lemon juice, jam or syrup.

Baked Asparagus with Balsamic Butter Sauce

I found this recipe at one of my foavorite recipes sites All Recipes . It is an easy and delicious way to make asparagus and my whole family loved it. I hope you do too!

Baked Asparagus with Balsamic Butter Sauce Adapted from All Recipes

1 bunch fresh asparagus, trimmed
olive oil
salt and pepper to taste
2 tablespoons butter
1 tablespoon soy sauce
1 teaspoon balsamic vinegar

Directions:
Preheat oven to 400 degrees F
Arrange the asparagus on a baking sheet. Drizzle with olive oil and toss to coat. Season with salt and pepper.
Bake asparagus 15 minutes in the preheated oven, or until tender.

While asparagus is baking, melt the butter in a saucepan over medium heat. Remove from heat, and stir in soy sauce and balsamic vinegar. Pour over the baked asparagus to serve.

BBQ pork sandwiches, Grilled Corn, & Creamy Dilled Potato Salad

This is a yummy meal but each item is delicious on it's own! I'll start with the BBQ, move on to the corn, and finish with this yummy dill potato salad!


BBQ Pork Sandwiches

This is easiest of all, no recipe really. Just add your favorite BBQ sauce ( we like Sweet Baby Rays) to roasted pork ( I used left over roast) and serve with cole slaw on a bun. Seriously, the kids were hesitant but it was very good! I just bought some cole slaw mix and mixed in slaw dressing from a jar, No recipe here but a great combination. We had never tried it this way before but will definitely do it again!


Grilled Corn
Ok, this is another easy peasy recipe that I got from my friend Sue. ( I love her recipes) Anyhow, you have to use canned corn! Yes, canned. Frozen and fresh corn won't work.

Drain your canned corn and dump it in a non stick skillet. Cook it on medium high heat until any water evaporates and the corn starts to brown and get a little carmelized. Season with salt and pepper. That's it! So easy and so yummy!!


Creamy Dilled Potato Salad from Family Circle Magazine
Ingredients
2-1/2 pounds small red- and white- skinned potatoes (about 1-inch diameter), unpeeled
1 medium-size onion, chopped
6 hard-cooked eggs, peeled and chopped
1 cup chopped dill pickles
1 cup light mayonnaise
3 tablespoons brine from pickles
1 teaspoon garlic salt
1/4 teaspoon black pepper
2 tablespoons chopped fresh dill
1. Place potatoes in a large pot of lightly salted water. Boil for 15 to 20 minutes or until tender. Drain well.
2. Cut the potatoes in half (cut larger potatoes in quarters so all pieces are about the same size). Place the potatoes, onion, eggs and pickles in a large bowl. Stir gently to combine.
3. In a small bowl, whisk together mayonnaise, brine, garlic salt, pepper and dill. Spoon mayo mixture into potato mixture and stir gently.
4. Cover and refrigerate 4 hours or overnight.

Mandarin Orange Salad

This is one of my favorite summer jello salads. I got this recipe from my sister-in-law Susan years ago and am excited to share it with you. I made this for the same get together that I had made the Chinese Chicken Salad for and it was gobbled up in a flash! I hope you enjoy it's sweetness. :)

Mandarin Orange Salad

Dissolve together:
1 large package (or two small) orange Jello
2 cups boiling water
Add:
1 small 6oz can frozen orange juice concentrate.
Dissolve in jello mixture
Add:
1/2 cup water
Approx. 3/4 of a 20oz can crushed pineapple with juice
1 can mandarin oranges, drained and cut
Miniature marshmallows.
Chill and let set up in fridge.
Mix 1 small package instant lemon pudding and spread on top of set jello. Then top with whipped cream or cool whip. Keep cold until ready to serve.

Chinese Chicken Salad

This is one of my favorite salad recipes that I got from my dear friend Sue! I doubled it for a get together and it was gone in a flash! It takes a little effort but it well worth it! It doesn't look like much but it is so incredibly yummy!

Chinese Chicken Salad
1 head iceberg lettuce, torn, washed & dried
1 Tablespoon toasted sesame seeds (found in the Asian section at the grocery store)
3 cooked chicken breasts, diced
*1/4 pkg won tons, fried
* Fried rice sticks

Dressing
4 Tablespoons sugar
2 tsp salt
1/2 cup olive oil
2 Tbs sesame oil
6 Tablespoons rice vinegar
Put dressing ingredients in a jar and shake/mix until the sugar dissolves.


Plan ahead....

*To save time and mess, you can buy fried won tons and fried rice sticks at most Chinese restaurants. I go to a Chinese buffet to get the fried won tons and to a different Chinese restaurant to get the rice sticks but it only costs me a couple of dollars and saves me a lot of work at home so I think it is well worth it! Just call around, they may think you are weird but that's OK, they'll understand once you explain what they are for.

Anyhow, if you are frying your own won tons and rice sticks, make sure you have plenty of time. Cut up the fresh won tons and deep fry them in oil. Set aside to drain. Then, deep fry the rice sticks in Very Hot (near boiling) oil. They will immediately puff up and you have to pull them out quickly! Be prepared and use metal tongs or a large metal slotted spoon to pull them out (it will warp your plastic.)

Drain and store the won tons and rice sticks in a paper sack until you are ready to serve the salad.

Toss all the ingredients and add dressing just before serving. YUMM!

Billys Vanilla Vanilla Cupcakes!

My daughter has become a big fan of Cupcake Wars on Food Network and has decided that she wanted to learn how to make cupcakes from scratch instead of using the box cake mix. We tried several vanilla cupcake recipes and this one won hands down. It is very good!

Just remember do not over bake them or they will get dry. Pull them out just before they look done an they will be moist and incredibly yummy. There are some tips and suggestions on making them here. The butter cream frosting is rich so you don't need as much as shown in these pictures but we were going for the gourmet look :)


Billy's Vanilla, Vanilla Cupcakes.... From Billy's Bakery NYC

Makes about 30 cupcakes

1 3/4 cups cake flour, not self-rising
1 1/4 cups unbleached all-purpose flour
2 cups sugar
1 tablespoon baking powder
3/4 teaspoon salt
1 cup (2 sticks) unsalted butter, cut into 1-inch cubes
4 large eggs
1 cup whole milk
1 teaspoon pure vanilla extract

1. Preheat oven to 325°. Line cupcake pans with paper liners; set aside. In the bowl of an electric mixer fitted with the paddle attachment, combine flours, sugar, baking powder, and salt; mix on low speed until combined. Add butter, mixing until just coated with flour.

2. In a large glass measuring cup, whisk together eggs, milk, and vanilla. With mixer on medium speed, add wet ingredients in 3 parts, scraping down sides of bowl before each addition; beat until ingredients are incorporated but do not over beat.

3. Divide batter evenly among liners, filling about two-thirds full. Bake, rotating pan halfway through, until a cake tester inserted in the center comes out clean, 17 to 20 minutes.

4. Transfer to a wire rack to cool completely. Repeat process with remaining batter. Once cupcakes have cooled, frost the tops of each cupcake. Decorate with sprinkles, if desired. Serve at room temperature.

Billy's Vanilla Butter cream

Colored sprinkles, for decorating (optional)
Makes enough for 30 cupcakes

1 cup (2 sticks) unsalted butter, room temperature
6 to 8 cups confectioners' sugar
1/2 cup milk
1 teaspoon pure vanilla extract

1. In the bowl of an electric mixer fitted with the paddle attachment, cream butter until smooth and creamy, 2 to 3 minutes. With mixer on low speed, add 6 cups sugar, milk, and vanilla; mix until light and fluffy. If necessary, gradually add remaining 2 cups sugar to reach desired consistency.

Enjoy!

What we've been up to

Well, it has been a busy summer and now that the kids are back in school I have the time to get back to my blog. But first, let me show you a little of how we started off our summer with a budget wise kitchen renovation!

Here is a picture of the kitchen when we were looking to buy the house 7 years ago.
I hated the laminate cabinet doors, white walls, and old light fixtures so they were the first thing to go! The previous owners had re-faced the cabinets so I ordered new oak doors to match the cabinets. It looked & felt so much better, but I still hated the counter tops and the kitchen felt very cramped. We lived with it that way for about 6 1/2 years.


This year we decided it was finally time for new counters and time to knock out some cabinets and open up the kitchen! I had been inspired by so many great kitchen renovations in blog land that we decided why not! We really had no idea how much work it would be but we are so glad we did it! It took about 2 weeks and we ate a lot of pizza and sub sandwiches but it was worth it!

First to go was the laminate on the walls. That took me days of using a heat gun and chisel to get the walls scraped. Ugh! I hope to never do that again...

Then it was time for some demolition!

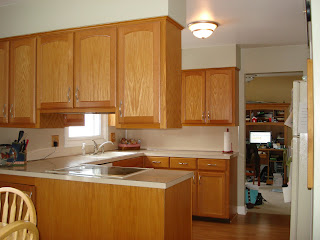
We (my husband) knocked down the cabinets and removed the bulk head which left a gaping hole that my son helped to patch up!
The stove had to be moved. So, we pulled it out and cut out the cabinets on the other side of the kitchen so we could move the stove and install the new microwave. We also had to re-wire for the stove and microwave. I'm so glad to have a handy husband!
We cut the face off the cabinets (They are built in cabinets) where we wanted the stove to go and re-built the cabinet shelves and facing where the stove had been.

We cut out cabinets on the other side to accommodate for a new over the range microwave and bought a new sink.
Then it was time to install the counters and tile the back splash. I found this great new product at Home Depot called Simple Mat. It makes tiling so quick and easy! We loved it!


It is a double sided sticky tape with glue strips. it was so easy to cut to size and stick on the wall. I could place the tile, adjust it with the level etc, leave to run an errand and get back to whenever I was ready. Once the tile is in place, you press it in and it is set. Then you can grout right away!
I bought the pre-mixed grout made by the same company.
So easy my 11 yr old son helped out.
Now all we have to do is put a fresh coat of paint on the walls. (The paint has been purchased!) I am so happy with how it turned out and we did it with very little expense!

I love having the free counter space and open feel. Honestly, I thought I would miss the storage space in the cabinets, but I found so much that I never used and got rid of it. The kitchen feels so much bigger! I still dream of a big gourmet kitchen some day with all new appliances, but for now, this is a great improvement! I have debated on whether to paint the cabinets an off white but the jury is still out on that one. :)

Remember the before..
And now the after.. (well, minus the fresh coat of paint and the third bar stool :)


I am linking up to The DIY Show Off Project Parade!


Now time for some recipes!