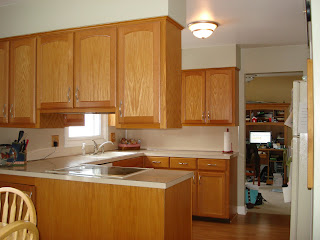
Here is a picture of the kitchen when we were looking to buy the house 7 years ago. 
I hated the laminate cabinet doors, white walls, and old light fixtures so they were the first thing to go! The previous owners had re-faced the cabinets so I ordered new oak doors to match the cabinets. It looked & felt so much better, but I still hated the counter tops and the kitchen felt very cramped. We lived with it that way for about 6 1/2 years.

I hated the laminate cabinet doors, white walls, and old light fixtures so they were the first thing to go! The previous owners had re-faced the cabinets so I ordered new oak doors to match the cabinets. It looked & felt so much better, but I still hated the counter tops and the kitchen felt very cramped. We lived with it that way for about 6 1/2 years.

This year we decided it was finally time for new counters and time to knock out some cabinets and open up the kitchen! I had been inspired by so many great kitchen renovations in blog land that we decided why not! We really had no idea how much work it would be but we are so glad we did it! It took about 2 weeks and we ate a lot of pizza and sub sandwiches but it was worth it!
First to go was the laminate on the walls. That took me days of using a heat gun and chisel to get the walls scraped. Ugh! I hope to never do that again...
Then it was time for some demolition!
 We (my husband) knocked down the cabinets and removed the bulk head which left a gaping hole that my son helped to patch up!
The stove had to be moved. So, we pulled it out and cut out the cabinets on the other side of the kitchen so we could move the stove and install the new microwave. We also had to re-wire for the stove and microwave. I'm so glad to have a handy husband!
Then it was time to install the counters and tile the back splash. I found this great new product at Home Depot called Simple Mat. It makes tiling so quick and easy! We loved it!

 We cut out cabinets on the other side to accommodate for a new over the range microwave and bought a new sink.


It is a double sided sticky tape with glue strips. it was so easy to cut to size and stick on the wall. I could place the tile, adjust it with the level etc, leave to run an errand and get back to whenever I was ready. Once the tile is in place, you press it in and it is set. Then you can grout right away! 
I bought the pre-mixed grout made by the same company.

So easy my 11 yr old son helped out.


I love having the free counter space and open feel. Honestly, I thought I would miss the storage space in the cabinets, but I found so much that I never used and got rid of it. The kitchen feels so much bigger! I still dream of a big gourmet kitchen some day with all new appliances, but for now, this is a great improvement! I have debated on whether to paint the cabinets an off white but the jury is still out on that one. :)
Remember the before..

I am linking up to The DIY Show Off Project Parade!

Now time for some recipes!
2 comments:
Wow, that turned out really great! Good work!
-Kendall
Songbirdsandbuttons.blogspot.com
Looks great Janelle!
Post a Comment